error: RPC failed でpushできなくなった
Push出来ていたと思っていたら出来ていなかった
git pushを実施したとき、それらしい表示がターミナルに出てたので、できたものだと思っていたら、GitHubにあがっていなかった
% git push origin main
Username for 'https://github.com': sk-noctua
Password for 'https://sk-noctua@github.com':
Enumerating objects: 434, done.
Counting objects: 100% (434/434), done.
Delta compression using up to 8 threads
Compressing objects: 100% (417/417), done.
error: RPC failed; HTTP 400 curl 22 The requested URL returned error: 400
send-pack: unexpected disconnect while reading sideband packet
Writing objects: 100% (434/434), 4.08 MiB | 4.46 MiB/s, done.
Total 434 (delta 43), reused 0 (delta 0), pack-reused 0
fatal: the remote end hung up unexpectedly
Everything up-to-date
よく見ると・・・・
error: RPC failed; HTTP 400 curl 22 The requested URL returned error: 400
どうも、git pushするときのパケットの容量によって、エラーが発生するらしい(と、ChatGPT君が言ってた)
下記のコマンド一発で解決した。
% git config --global http.postBuffer 157286400
DebugProbeでTimer割込が動作しない
DebugProbeでTimer割込が動作しない
結論
プロセッサがデバッグモードの時の動作を設定するレジスタが存在する。
そのレジスタに予めデバッグモード時の動作をセットしておく必要がある
// デバッグ時のタイマー動作設定(Debug Probeで動かすとき)
DBGPAUSE.DBG0 = 0x0;   // プロセッサ0がデバッグモードのときに一時停止する → 無効
DBGPAUSE.DBG1 = 0x0;   // プロセッサ1がデバッグモードのときに一時停止する → 無効
まとめてやるなら
timer_hw->dbgpause = 0x0;
補足
OpenOCDのバージョン0.12.0以降は対策済みとの事。
なので、自分で最新版をコンパイルするなりバイナリダウンロードするなりで対応すればOKらしい。
https://github.com/raspberrypi/pico-sdk-tools/releases/tag/v2.0.0-5
This is a known issue with the 0.12.0 release of OpenOCD - for example see
https://github.com/raspberrypi/pico-vscode/issues/102

It's been fixed since 0.12.0, so for a pre-compiled OpenOCD version that fixes this problem you can try and use the XPack one, or download our pre-compiled one from the pico-sdk-tools repository.
MacのParallelsでHDD容量を増やす方法(Ubuntu)
HDD容量が不足した
訳あって、100GB程度の空き容量が必要になった。
MacBook M2 SequoiaでPicoのbuildがエラーになる
ウキウキしてSequoiaにバージョンアップしたらmakeができなくなっていた。
結論
pico-exampleをpullして最新のCMakeLists.txtを取得する
環境新しくなって動かなくなったら、CMakeListsを疑うのが間違いない。
pico-exampleディレクトリを別名でコピーして、cloneでまるっと入れ替える方が早いかも。
% git clone https://github.com/raspberrypi/pico-examples.git --branch master
コンパイル通らなくなったプロジェクトのCMakeLists.txtを更新する
案の定、バージョンやら設定やらが新しくなっているのでその部分をまんま反映する
Xcodeのバージョンをあわせる
Macでコンパイルするのに、Xcodeのツールを利用している。
なので、CMakeLists.txtを編集し、XcodeのSDKバージョンとかをあわせる必要がある。
sonoma時は、MacOSX14.5.sdkを利用していた模様(この記事の、かな〜り下に書いている「経緯」に記載しているエラーに含まれている)
cmake_minimum_required(VERSION 3.12)

# Pull in SDK (must be before project)
include(pico_sdk_import.cmake)
include(pico_extras_import_optional.cmake)

project(pico_examples C CXX ASM)

set(CMAKE_C_STANDARD 11)
set(CMAKE_CXX_STANDARD 17)

if (PICO_SDK_VERSION_STRING VERSION_LESS "2.0.0")
    message(FATAL_ERROR "Raspberry Pi Pico SDK version 2.0.0 (or later) required. Your version is ${PICO_SDK_VERSION_STRING}")
endif()

set(PICO_EXAMPLES_PATH ${PROJECT_SOURCE_DIR})

# If you want debug output from USB (pass -DPICO_STDIO_USB=1) this ensures you don't lose any debug output while USB is set up
if (NOT DEFINED PICO_STDIO_USB_CONNECT_WAIT_TIMEOUT_MS)
    set(PICO_STDIO_USB_CONNECT_WAIT_TIMEOUT_MS 3000)
endif()

# Initialize the SDK
pico_sdk_init()

include(example_auto_set_url.cmake)

function(add_subdirectory_exclude_platforms NAME)
    if (ARGN)
        if (PICO_PLATFORM IN_LIST ARGN)
            message("Skipping ${NAME} example which is unsupported on this platform")
            return()
        endif()
        foreach(PATTERN IN LISTS ARGN)
            string(REGEX MATCH "${PATTERN}" MATCHED "${PICO_PLATFORM}")
            if (MATCHED)
                message("Skipping ${NAME} example which is unsupported on this platform")
                return()
            endif()
        endforeach()
    endif()
    add_subdirectory(${NAME})
endfunction()


## Debug Option ------------------   追加したとこ
set(CMAKE_BUILD_TYPE Debug)
set(CMAKE_C_FLAGS "${CMAKE_C_FLAGS} -g3")
set(CMAKE_CXX_FLAGS "${CMAKE_CXX_FLAGS} -g3")
## -------------------------------------------

## MacOS Option Xcode ------------ 追加したとこ
set(CMAKE_OSX_SYSROOT /Applications/Xcode.app/Contents/Developer/Platforms/MacOSX.platform/Developer/SDKs/MacOSX.sdk)
## -------------------------------------------

add_compile_options(-Wall
        -Wno-format          # int != int32_t as far as the compiler is concerned because gcc has int32_t as long int
        -Wno-unused-function # we have some for the docs that aren't called
        )
if (CMAKE_C_COMPILER_ID STREQUAL "GNU")
    add_compile_options(-Wno-maybe-uninitialized)
endif()

  ・
  ・
  ・
 以下省略
コンパイル環境構築の補足情報
pico-exampleをコンパイルするために、extrasも必要になる。(CMakeLists.txtに関連している)
面倒なので、最新のクローンを作成するコマンドをメモしておく
% git clone https://github.com/raspberrypi/pico-sdk.git --branch master
% git clone https://github.com/raspberrypi/pico-examples.git --branch master
% git clone https://github.com/raspberrypi/pico-extras.git --branch master
経緯
ここから下は、上記「結論」までの経緯
You have not agreed to the Xcode and Apple SDKs license. You must agree to the license below in order to use Xcode.
Press enter to display the license:
翻訳すると・・・
あなたは、Xcode と Apple SDKs のライセンスに同意していません。Xcodeを使用するには、以下のライセンスに同意する必要があります。
エンターキーを押すとライセンスが表示されます:
となるので、Enterキーを叩くと
Agreeing to the Xcode and Apple SDKs license requires admin privileges, please accept the Xcode license as the root user (e.g. 'sudo xcodebuild -license').
こちらも翻訳すると
Xcode と Apple SDKs のライセンスに同意するには、管理者権限が必要です。root ユーザーとして Xcode のライセンスに同意してください (例 'sudo xcodebuild -license')。
なので、コマンド入れてみた
% sudo xcodebuild -license
するとこうなった
By typing 'agree' you are agreeing to the terms of the software license agreements. Any other response will cancel. [agree, cancel]
同意する」と入力すると、ソフトウェア使用許諾契約の条項に同意したことになります。それ以外の回答はキャンセルされます。[同意する、キャンセルする]
ので、 agree と入力すると
You can review the license in Xcode’s About window, or at: /Applications/Xcode.app/Contents/Resources/en.lproj/License.rtf
となりました。
ここまでできたら
% make -j8
とすると、先に進んだが下記のエラーが。
たぶん、CMakeLists.txtが新しくなっていると予想。
[  1%] Built target bs2_default
[  2%] Performing build step for 'PioasmBuild'
[ 10%] Building CXX object CMakeFiles/pioasm.dir/main.cpp.o
c++: warning: no such sysroot directory: '/Applications/Xcode.app/Contents/Developer/Platforms/MacOSX.platform/Developer/SDKs/MacOSX14.5.sdk' [-Wmissing-sysroot]
/Users/k/pico/pico-sdk/tools/pioasm/main.cpp:7:10: fatal error: 'iostream' file not found
    7 | #include <iostream>
      |          ^~~~~~~~~~
1 error generated.
なので、CMakeLists.txtを新しく更新してみた。
cmake_minimum_required(VERSION 3.12)

# Pull in SDK (must be before project)
include(pico_sdk_import.cmake)
include(pico_extras_import_optional.cmake)

project(pico_examples C CXX ASM)

set(CMAKE_C_STANDARD 11)
set(CMAKE_CXX_STANDARD 17)

if (PICO_SDK_VERSION_STRING VERSION_LESS "2.0.0")
    message(FATAL_ERROR "Raspberry Pi Pico SDK version 2.0.0 (or later) required. Your version is ${PICO_SDK_VERSION_STRING}")
endif()

set(PICO_EXAMPLES_PATH ${PROJECT_SOURCE_DIR})

# If you want debug output from USB (pass -DPICO_STDIO_USB=1) this ensures you don't lose any debug output while USB is set up
if (NOT DEFINED PICO_STDIO_USB_CONNECT_WAIT_TIMEOUT_MS)
    set(PICO_STDIO_USB_CONNECT_WAIT_TIMEOUT_MS 3000)
endif()

# Initialize the SDK
pico_sdk_init()

include(example_auto_set_url.cmake)

function(add_subdirectory_exclude_platforms NAME)
    if (ARGN)
        if (PICO_PLATFORM IN_LIST ARGN)
            message("Skipping ${NAME} example which is unsupported on this platform")
            return()
        endif()
        foreach(PATTERN IN LISTS ARGN)
            string(REGEX MATCH "${PATTERN}" MATCHED "${PICO_PLATFORM}")
            if (MATCHED)
                message("Skipping ${NAME} example which is unsupported on this platform")
                return()
            endif()
        endforeach()
    endif()
    add_subdirectory(${NAME})
endfunction()


## Debug Option ------------------   追加したとこ
set(CMAKE_BUILD_TYPE Debug)
set(CMAKE_C_FLAGS "${CMAKE_C_FLAGS} -g3")
set(CMAKE_CXX_FLAGS "${CMAKE_CXX_FLAGS} -g3")
## -------------------------------------------

## MacOS Option Xcode ------------ 追加したとこ
set(CMAKE_OSX_SYSROOT /Applications/Xcode.app/Contents/Developer/Platforms/MacOSX.platform/Developer/SDKs/MacOSX.sdk)
## -------------------------------------------

add_compile_options(-Wall
        -Wno-format          # int != int32_t as far as the compiler is concerned because gcc has int32_t as long int
        -Wno-unused-function # we have some for the docs that aren't called
        )
if (CMAKE_C_COMPILER_ID STREQUAL "GNU")
    add_compile_options(-Wno-maybe-uninitialized)
endif()

  ・
  ・
  ・
 以下省略
Raspberry Pi OS 64bitにEmacs29.4をインストール
Raspberry Pi OS(64bit)にEmacs29.4をビルドインストール
Raspberry Pi OSにapt installコマンドでEmacsを導入すると、少し古めのバージョンがインストールされます。
折角なので最新版をソースコードからビルドして構築してみます。
ソースのダウンロード
GNU Emacs download - GNU Projectにある「 nearby GNU mirror」をクリックして、最新のソースをダウンロードします。
2024年7月28日時点での最新は、emacs-29.4.tar.gzでした。
開発環境のインストール
無事にemacs-29.4.tar.gzをダウンロードできたら、Linuxターミナルを起動してコンパイルの前作業を実施。
コンパイルをするために必要なあれこれを事前にインストールしておきます。
# まず解凍
$ tar zxvf emacs-29.4.tar.gz

# 解凍したディレクトリへ移動
cd emacs-29.4

# コンパイルするための不足ぶんを確認
./configure
すると、GUI表示のライブラリ一式が無いですよと画面に表示されます。
なのでGUI表示に必要なライブラリ一式をインストール。
sudo apt install build-essential texinfo libx11-dev libxpm-dev libjpeg-dev libpng-dev libgif-dev libtiff-dev libgtk2.0-dev libncurses-dev gnutls-dev libgtk-3-dev libgif-dev librsvg2-dev
起動
$ emacs
Raspberry Pi 5 + M.2 NVMe SSD
Raspberry Pi 5 + M.2 NVMe SSD
話題のPi5にM.2 NVMe SSDを接続してBootする手順メモ。
Pi5用HatとSSDを接続
実装テストした機器は下記の通り。
Fikwot FN501 Pro 250GB NVMe SSD M.2 2280 PCIe Gen3 x4 内蔵 SSD
Geekworm X1001 V1.1 PCIe NVMe M.2 SSD 2280拡張ボード

接続方法等は、ネットで調べた。
MicroSD作成
どうやっても、最初はMicroSDへ通常通りにPiOSをセットアップします。
Pi OSのイメージをダウンロードして焼き付ける方法でも良いのだけれど、昨今は専用の「Raspberry Pi Imager」ってアプリで、ネットからダウンロードしながら焼いてくれるナイスなツールがあります。
NVMe M.2 SSD へOSインストール
作成したMicroSDをPi5へ押し、電源ON。
通常通りにOSを起動する。
Pi5を最新の状態に
下記コマンドをターミナルで順番に実行
$ sudo apt update; sudo apt -y upgrade
$ sudo rpi-eeprom-update -a
NVMe SSDを有効に
$ sudo raspi-config
 → Advanced Options -> Boot Order -> NVMe/USBと選択 -> Finish
再起動
raspi-config終了時、再起動を促されるので、再起動する。
もし、何らかの理由で再起動を促されなかった場合は、左上のRaspberryアイコンクリックから、マウス操作でPi5を再起動する。
Pi5再起動後、下記操作でImagerを起動。
Raspberryアイコン → Accessories → Imager
Raspberry Pi OSをNVMe SSDに転送
下記の通り選択して実施。
- Raspberry Pi Device → RASPBERRY PI 5
- Operating System → RASPBERRY PI OS Desktop(64bit)
- Strage → FIKWOT FN501 PRO 250GB
250GBのSSDで、1時間弱ほどかかった。
Pi5 EEPROM設定変更
下記の通りコマンドを実行し、設定を書き換える。
ここでの作業により、MicroSDではなくSSD起動するようになります。
BOOT_ORDERの仕様については、本家に記載がありました。
$ sudo rpi-eeprom-config --edit

[all]
# BOOT_ORDERを変更。fより右に6を含める
BOOT_ORDER=0xf416
ファイルを保存し閉じると、自動的にEEPROMが書き換えられるようです。
電源を落とし、MicroSDを抜いて起動
無事に再起動したら、もう一度電源を切り、MicroSDを抜いて電源ON
$ sudo shutdown -h now
電源落ちたら、MicroSDを抜いて、電源ON!
再起動後のセットアップ(おまけ)
PiOSの初期設定値を変更しておきます
localisationの変更
raspberryアイコン → Preference → Raspberry Pi Configuration → Locale → Japanに設定
TimeZoneの設定
raspberryアイコン → Preference → Raspberry Pi Configuration → TimeZone → Asia / Tokyo
MacBook Air M2でPico Probe開発環境構築
MacBook Air M2でPicoProbeをセットアップ
この記事でわかること
Raspberry Picoの公式ドキュメントを参考に、Bashプロンプトでアレコレ操作してコンパイル〜デバッグまでを行える環境を構築します。
ArudinoIDEやらVSCodeやらの記事は、他の方にお任せして、ここでは公式ドキュメントを参考に、コマンドラインで一通りの作業を行う方法を記事にしています。
コンパイル環境構築
事前に、コンパイル環境構築を完了させてください。
↓↓
MacBook Air M2でPi Picoのビルド環境構築
PicoProbeの作成
下記のURLのリンク【Debugging using another Raspberry Pi Pico】のDownload the UF2 fileからUF2ファイルをダウンロードします。
ファイル名:picoprobe.uf2
↓↓
Debugging using another raspberrypi pico
通常のプログラム書き込みと同様に、Pi Picoにpicoprobe.uf2を書き込みます。
↓↓
PipicoのBOOTボタン押しながら、MacbookにUSB接続。 → 外付けドライブとして「RPI-RP2」がFinderに認識される
picoprobe.uf2をRPI-RP2へコピー。
OpenOCDのビルド
必要なツールをインストール
$ brew install libtool automake libusb wget pkg-config gcc texinfo
ビルド
$ cd ~/pico
$ git clone https://github.com/raspberrypi/openocd.git --branch rp2040-v0.12.0 --depth=1 $ cd openocd
$ cd ./openocd
$ export PATH="$(brew --prefix)/opt/texinfo/bin:$PATH"
$ ./bootstrap
$ ./configure --enable-picoprobe --disable-werror
$ make -j4
$ sudo make install
OpenOCD実行
結果エラーになるけれど、実行できていればきにしない
$ src/openocd
Open On-Chip Debugger 0.10.0+dev-gc231502-dirty (2020-10-15-07:48)
Licensed under GNU GPL v2
For bug reports, read
        http://openocd.org/doc/doxygen/bugs.html
embedded:startup.tcl:56: Error: Can't find openocd.cfg
in procedure 'script'
at file "embedded:startup.tcl", line 56
Info : Listening on port 6666 for tcl connections
Info : Listening on port 4444 for telnet connections
Error: Debug Adapter has to be specified, see "interface" command
embedded:startup.tcl:56: Error:
in procedure 'script'
at file "embedded:startup.tcl", line 56
PicoProbeテスト
PicoProbeと開発ターゲット用のPiPicoを結線
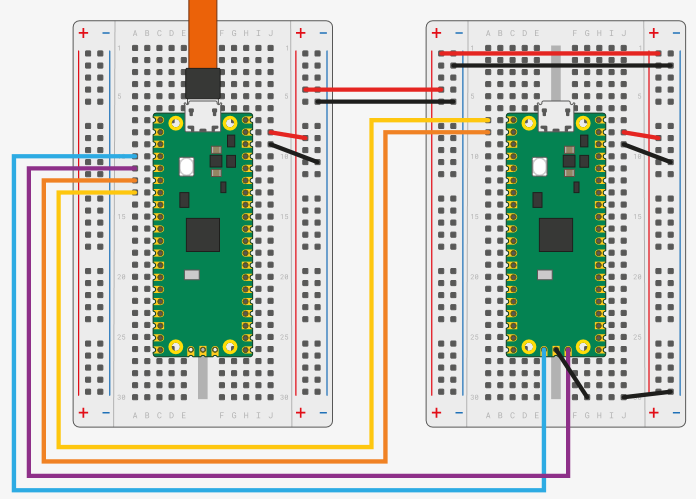
Pico A GND -> Pico B GND
Pico A GP2 -> Pico B SWCLK
Pico A GP3 -> Pico B SWDIO
Pico A GP4/UART1 TX -> Pico B GP1/UART0 RX
Pico A GP5/UART1 RX -> Pico B GP0/UART0 TX
Pico A VSYS -> Pico B VSYS
OpenOCD起動
$ openocd -f interface/cmsis-dap.cfg -c "adapter speed 5000" -f target/rp2040.cfg -s tcl
※~/opt/shell/openocd_pico.sh としてスクリプト化し活用しています。
Open On-Chip Debugger 0.12.0-g4d87f6d (2024-03-02-15:47)
Licensed under GNU GPL v2
For bug reports, read
        http://openocd.org/doc/doxygen/bugs.html
adapter speed: 5000 kHz

Info : Hardware thread awareness created
Info : Hardware thread awareness created
Info : Listening on port 6666 for tcl connections
Info : Listening on port 4444 for telnet connections
Info : Using CMSIS-DAPv2 interface with VID:PID=0x2e8a:0x000c, serial=E66044304317392D
Info : CMSIS-DAP: SWD supported
Info : CMSIS-DAP: Atomic commands supported
Info : CMSIS-DAP: Test domain timer supported
Info : CMSIS-DAP: FW Version = 2.0.0
Info : CMSIS-DAP: Interface Initialised (SWD)
Info : SWCLK/TCK = 0 SWDIO/TMS = 0 TDI = 0 TDO = 0 nTRST = 0 nRESET = 0
Info : CMSIS-DAP: Interface ready
Info : clock speed 5000 kHz
Info : SWD DPIDR 0x0bc12477, DLPIDR 0x00000001
Info : SWD DPIDR 0x0bc12477, DLPIDR 0x10000001
Info : [rp2040.core0] Cortex-M0+ r0p1 processor detected
Info : [rp2040.core0] target has 4 breakpoints, 2 watchpoints
Info : [rp2040.core1] Cortex-M0+ r0p1 processor detected
Info : [rp2040.core1] target has 4 breakpoints, 2 watchpoints
Info : starting gdb server for rp2040.core0 on 3333
Info : Listening on port 3333 for gdb connections
実行ファイルの読込/実行
テストとして、サンプルのblinkを動かしてみます。
GDB起動
前項で動かしたOpenOCDのプロンプトはそのままに、新しくプロンプトを新規に開いて、以降のコマンドを実施します。
$ cd  ~/pico/pico-examples/build/blink
$ arm-none-eabi-gdb -q -ex "target extended-remote :3333" ./blink.elf
Reading symbols from ./blink.elf...
(No debugging symbols found in ./blink.elf)
Remote debugging using :3333
warning: multi-threaded target stopped without sending a thread-id, using first non-exited thread
0x10000ce2 in sleep_until ()
(gdb)
プログラムのロード
(gdb) load
Loading section .boot2, size 0x100 lma 0x10000000
Loading section .text, size 0x1d88 lma 0x10000100
Loading section .rodata, size 0xf4 lma 0x10001e88
Loading section .binary_info, size 0x20 lma 0x10001f7c
Loading section .data, size 0x18c lma 0x10001f9c
Start address 0x100001e8, load size 8488
Transfer rate: 10 KB/sec, 1697 bytes/write.
リセット
(gdb) monitor reset
※ 以前は、monitor reset init だったが、なぜかinitを入れるとタイマー関連の関数が動かない症状が出る。
プログラムの実行
(gdb) continue
プログラムの停止
Ctrl + c 操作で強制停止
(gdb) continue
Continuing.
^C
Thread 1 "rp2040.core0" received signal SIGINT, Interrupt.
0x10000ce2 in sleep_until ()
(gdb)
デタッチ
(gdb) detach
Detaching from program: /Users/k/pico/pico-examples/build/blink/blink.elf, Remote target
[Inferior 1 (Remote target) detached]
(gdb)
終了
(gdb) quit
